Build a Simple Web App with Golang


We all know how Golang finds a wide array of applications on the server side. It is ideal for systems programming, cloud computing, designing web applications, and what not. In this blog, we will focus on Golang web development. We will try to create a simple web app from scratch, based on which you can develop further. So, let us get started. If you're looking for a professional Golang web development company, they can help you harness the power of this language to build robust and efficient web applications.
So, let us get started.
Initial Task
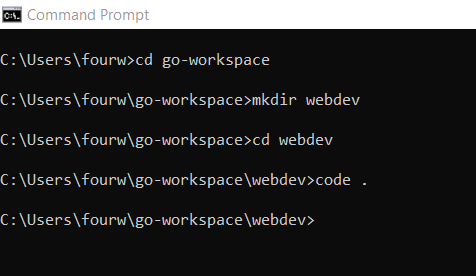
- As soon as we type code ., the IDE opens up. In this case, we are using VS Code.
- We get to see webdev directory created on the VS Code. Following this, we create a folder ‘outline’ under which we create a file named outline.html.
- Next, we create another folder steady inside the webdev directory. And we include two more files named sale.png (which consists of a random image) and outline.css.
- Finally, we include one more file named main.go.
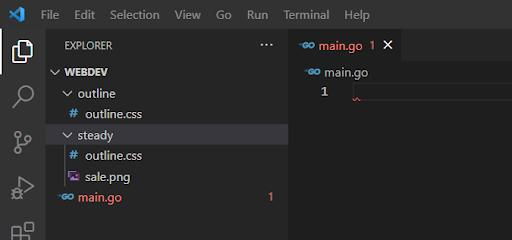
You can see the snapshot of the directory below.
Coding in the main.go File
1. So, let us start with the coding in the main.go file.
1
2
3
4
5
6
7
8
9
10
11
package main
import (
“fmt”
“html/template”
“net/http”
“time”
)
type Hello struct  {
Sale string
Time string
}
- Following package main, we have imported four different packages. These are:
fmt
html/template
net/http
time
It is understood that you are aware of the purpose of each of these packages.
- As you can see, we have created a struct here with two data fields. These are Sale of type string and Time of type string.
2. Next, we move on to function main()
1
2
3
4
5
6
7
8
9
10
11
12
13
14
15
func main() {
hello := Hello{ “Sale Commences Now”, time.Now().Format(time.Stamp)}
outline := template.Must(template.ParseFiles(“outline/outline.html”))
http.Handle(“/steady/”, http.StripPrefix(“/steady/”, http.FileServer(http.Dir(“steady”))))
http.HandleFunc(“/”, func (w http.ResponseWriter, r *http.Request) {
              if sale := r.FormValue(“sale”); sale != “” {
              hello.Sale= sale
}
             if err := outline.ExecuteTemplate(w, “outline.html”, hello), err !=nil {
             http.Error(w, err.Error(), http.StatusInternalServerError)
}
})

fmt.Println(http.ListenandServe(“:8080”, nil))
}
Ok, so we have a lot to understand from the above-mentioned code. Meanwhile, how are you finding the programming? Isn’t it exciting to conduct web development in Golang?
- We create a variable hello, where we initialize the data fields contained within the struct. The “Sale Commences Now” is stored in the Sale string and the time.Now() functions displays the current time as per the format Format(time.Stamp).
- We create another variable outline. In this case, you must know that the template package offers the Must function. This is used to test the validity of the template during parsing.
- Now, you must be wondering what is the role of template.Parsefiles(). Well, it is responsible for creating a new template. And then it parses the various template definitions from outline/outline.html.
- As we have imported the package net/http, we can use the function http.Handle. The Handle accepts the http.Handler . The http.StripPrefix is used to access the static files that are present in the ‘steady’ folder inside the webdev directory. It forwards the handling of the request to ‘steady’ as we have mentioned it as the parameter.
- The handler that FileServer provides serve HTTP requests with the information of the file system starting at its root. You are converting the string ‘steady’ into http.Dir type.
- What does the HandleFunc method do? Simply put, it provides a way to highlight how requests to a specific route should be handled. The function (w http.ResponseWriter, r*http.Request) is used for reading and writing purposes.
- Now, if sale variable reads the FormValue as “sale”, and sale is not nil, then the struct data field hello.Sale will take the value ‘sale”
- Next, we have to understand the role of ExecuteTemplate. It stops applying the template if there is any error. It is taking into consideration the template that has been described in outline.html (which we will look into later on in this blog).
- Since the http package is responsible for offering client and server implementations, it also checks for status of any error with http.StatusInternalServerError.
- In order to handle requests from incoming connections, ListenandServe first calls Serve with Handler while listening on the TCP network address.
Hopefully, you were able to comprehend the purpose of each function.
Coding in the HTML File
3. Then, we move on to the outline.html source file
1
2
3
4
5
6
7
8
9
10
<html>
    <head>
      <meta charset= “UTF-8”>
      <link rel= “stylesheet” href=”steady/outline.css”>
 <title> Hi {{.sale}} </title>
</head>
<body>
    <div class = “Greetings Hub”> Last Day {{.Sale}}, {{.Time}}</div>
</body>
</html> - The code mentioned above is self-explanatory. All we are doing here is specifying the structure or the outline of the web page. The charset attribute helps in highlighting the character encoding for the chosen HTML document. And as per HTML5 specification, it asks for the developers to make use of the UTF-8 character set.
- The line <link rel= “stylesheet” href… defines that there is a connection between the current HTML document (outline.html) and external source (outline.css). The “stylesheet” denotes how the document will be presented on the screen.
- Usually the HTML elements belong to different classes. In order to differentiate the class names, we are using <div class= “Greetings Hub”>. And we are displaying the Last Day along with the value of Sale and Time (remember the struct Hello we created in the main.go file with two different data fields).
With this the HTML document creation comes to an end.
Coding in the CSS File
4. Following this, we go to the outline.css source file that is inside ‘steady’. And we type the code:
1
2
3
4
5
6
7
8
9
10
11
12
13
14
15
16
17
18
19
body {
background-image: url (“/steady/.png”);
min-height: 140%;
background-size: cover;
background-blend-mode: overlay;
}

.hello {
font-size: 2rem;
font-family: ‘Arial’, Tahoma, Geneva, Times New Roman, sans-serif;
color: lightgreen ;
}

.center {
height: 100vh;
justify-content: center;
display: flex;
align-items: center;
}
- The above code is easy to understand. You are just describing the presentation of the web page. For the body, we specify the background-image, min-height, background-size and background-blend-move.
- Similarly, for .hello, we highlight the font-size, font-family, and color.
- Finally, for the .center, we describe the height, display, justify-content, align-items. You can check out the value that we have set from the above code.
- With this, the programming portion comes to an end.

Now, when we run the program in the terminal with go run main.go, it runs perfectly. Upon typing localhost:8080, we get to see the webpage. Hopefully, you have understood the coding part and how to create a sample web application. Once you get to understand the project, you can move on to bigger projects.
If you wish to know about the code, please visit: https://github.com/GolangCompany/web-app-dev


Build Your Golang Team