How to connect the Golang app with MongoDB ?


In this blog, you will understand how to connect your application in Go (Golang) with your MongoDB cluster. You will also learn how to ping the cluster to check your connection as well. If you are new to Golang development then you have landed at the right place.
Before proceeding you need to set up a few things which are important to initiate the program. The first aspect which you need to look into is having an account in MongoDB Atlas. MongoDB Atlas is a cloud version of MongoDB and this is what you will be using to establish a connection with your Go application. I will also discuss the problems which you can encounter during the whole process of establishing the connection in the later part of the blog.
Setting up the Workspace
To initialise, first, you will be creating a directory for our code. You can use the following commands to do so,
“cd Desktop”
“mkdir MongoConnection”
“cd MongoConnection”
“code .”
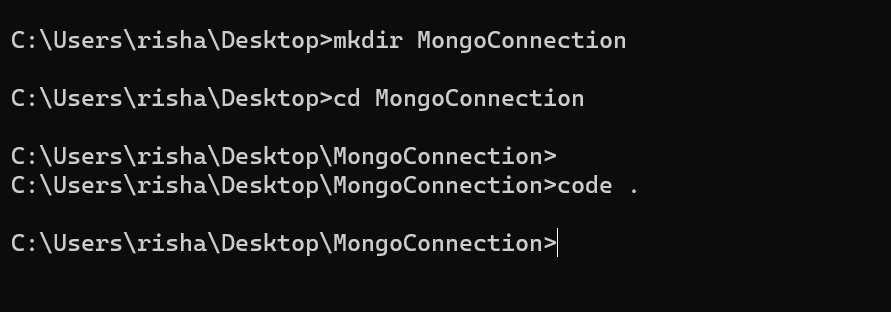
By typing “code .” command, the IDE (Integrated Development Environment) will pop up with the directory in it. In our case, it is VS Code Editor. VS Code Editor is very popular among all IDE which I will be using in this tutorial to build our program. In your directory (MongoConnection) that you have created, you will create a new file naming it “main.go” and pull the terminal in the IDE itself for easy initialisation.
Adding Dependencies
This is a very important part that needs to be executed before proceeding. You will initialise the project with go mod and add dependencies like mongo driver. To install go mod you will be using the “go mod init github.com/golangcompany/(Directory Name)” command in our terminal and following that “go mod tidy” command should be entered. You need to import the mongo driver as well by entering the command “go get go.mongodb.org/mongo-driver/mongo“
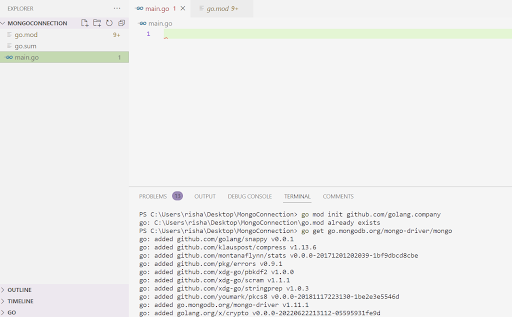
As you can notice from the image above, how I have entered the command and added dependencies that are required to initialise our program.
Role of MongoDB Atlas
Here in this section, you will understand the role of MongoDB Atlas in our project and also learn how to fetch the URI for the establishment of a connection between our Go application and MongoDB database step by step.
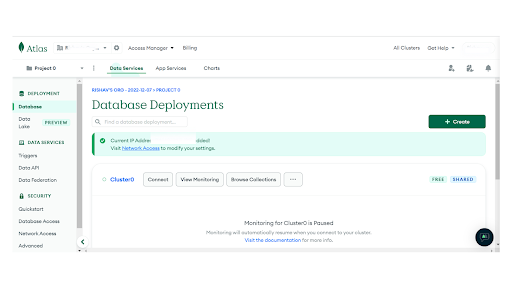
The below image is the user interface for the MongoDB Atlas. You will perform some steps to fetch the URI and integrate it into your code later in the project.
Step 1 - To begin with, you need to create an account in MongoDB Atlas. After setting up the account you will notice something similar to the image given below.
Step 2 - You need to navigate to Database (Present on the right panel) and then click on connect.
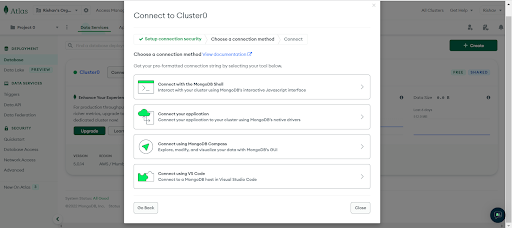
Step 3 - After clicking on connect you will encounter a dialog as given in the image above that offers you 4 options i.e., connect with MongoDB Shell, connect your application, connect using MongoDB Compass and connect using VS Code.
In this case, you will be opting to connect with your application.
Step 4 - Clicking on connect would offer you the connection string or the URI that you can integrate into your code. Before copying down the string you need to select the appropriate language that you are using and the version of it. In this case, you will select “Go” as your driver and since I am using version 1.19.4, I have opted for “1.6 or later” so you will perform the same action as well. This will provide the correct string that should be integrated into the code.
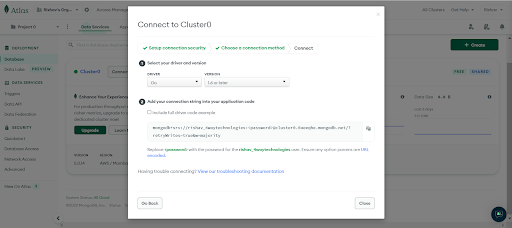
Now, since you have the correct connection string or the URI for integration, you need to copy that and move toward writing your code.
Writing the Code
In this section, you will be understanding how to write the code for establishing the connection of your Go application with MongoDB. To begin with, you will be writing “package main” and importing some default packages of Go like context, fmt, log & time.
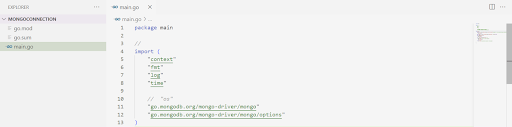
Importing packages from Go’s standard library
- context - Let,s consider an example to understand the context package, suppose you are calling an API and it’s not responding so you won’t wait for the whole day to wait for the response. Therefore you need to stop the call or instruct for a timeout, these are all carried out by context package.
- fmt - The fmt package implements the formatted input or output, for example, if you want to print something in the console then we import fmt package.
- Log - Log package is present in Go standard library that provides basic logging features.
- Time - For measurement and display of time, the package time is used.
Creating the Main Function
The first step will include establishing a connection with the MongoDB Cluster. Therefore you need to write,
1
2
3
func main() {
    client, err := mongo.NewClient(options.Client().ApplyURI(""))
    }
As you can see, I have written a code for establishing the connection with the cluster but the URI is blank for now. Here you need to add the connection string or the URI that you have copied from your MongoDB Atlas previously to establish the connection.
1
2
3
4
5
func main() {
    client, err := mongo.NewClient(options.Client().ApplyURI("mongodb+srv://<Username>:<Password>@cluster0.0aeeqhe.mongodb.net/?retryWrites=true&w=majority"))
    if err != nil {
        log.Fatal(err)
    }
After adding the connection string you need to edit two credentials to establish a successful connection with the server i.e., username and password, therefore, you will remove <Username> and <Password> with your original credentials of MongoDB cluster and proceed with using t
1
2
3
4
5
ctx, cancel := context.WithTimeout(context.Background(),10*time.Second)
    defer cancel()
    err = client.Connect(ctx)
    if err != nil {
        log.Fatal(err)
he if condition.
Here I am entering if condition in my code to give a command to the system if the connection does not get established for any reason it should log the error [by using log.Fatal(err)]
After this step, you need to instruct the system about the timeout therefore you need to use the following code,
1
2
3
4
5
ctx, cancel := context.WithTimeout(context.Background(),10*time.Second)
    defer cancel()
    err = client.Connect(ctx)
    if err != nil {
        log.Fatal(err)
If you don’t instruct the program with a timeout step it will continue to try and establish a connection with the cluster therefore this step is crucial in our scenario.
As you can see in the code, I have also integrated a line i.e., defer cancel(). When a function is returned to execution, defer method is used. You can mention this at the end of the code as well. In the end, you need to add an if function so that if there's any error it will log the error.
Basically in the next part of the code, you have to instruct the program to send a request for a connection to the database using the ping method.
1
2
3
4
5
err = client.Ping(context.TODO(), nil)
    if err != nil {
        log.Println("failes to connect mongodb")
        fmt.Println(err)
    }
And if any error occurs it will print the line “fails to connect to MongoDB”. In case, there are no errors and all the operations are executed correctly, you need to print the line: “Successfully Connected to the MongoDB”
1
2
3
if err == nil {
        fmt.Println("Successfully Connected to the mongodb")
    }
The overall code is mentioned below which will give us a broad idea of the process,
1
2
3
4
5
6
7
8
9
10
11
12
13
14
15
16
17
18
19
20
21
22
23
24
25
26
27
28
29
30
31
32
33
34
35
package main

//
import (
    "context"
    "fmt"
    "log"
    "time"

    //  "os"
    "go.mongodb.org/mongo-driver/mongo"
    "go.mongodb.org/mongo-driver/mongo/options"
)

func main() {
Client, err := mongo.NewClient(options.Client().ApplyURI("mongodb+srv://
rishav_4waytechnologies:uavSMRLyrLgZ2urI@cluster0.0aeeqhe.mongodb.net/?retryWrites=true&w=majority"))
    if err != nil {
        log.Fatal(err)
    }
    ctx, cancel := context.WithTimeout(context.Background(), 10*time.Second)
    defer cancel()
    err = client.Connect(ctx)
    if err != nil {
        log.Fatal(err)
    }
    err = client.Ping(context.TODO(), nil)
    if err != nil {
        log.Println("failes to connect mongodb")
        fmt.Println(err)
    }
    if err == nil {
        fmt.Println("Successfully Connected to the mongodb")
    }
}
Code Execution in the Terminal
Finally, it's time to run the code by giving the “go run main.go” command in the terminal.

In the above image, you can observe that I ran out the program and it is giving me the message “successfully connected to MongoDB”. This is how you can establish a connection between your Go application and MongoDB Cluster.
Mistakes to be aware of
While running the code, you may face an issue related to the credentials you are providing to the connection string. Precisely, if the <Username> and <Password> in the connection string are not mentioned correctly, it will show an error.
The image below will give you more clarity about the error.

If you are continuously getting this error, my suggestion to you is - to cross-check your Username and change the password of your cluster.


Build Your Golang Team